You can’t give map both a block and an argument, you have to choose.
In the first case, the map function will browse the array and multiply each elements of the array by 2. On the second case, the map function will also browse the array, but will call for each element the to_s function. How the eck is that possible ?
Recoding map
Just to make sure we understand everything we can recode the function. Here is our implementation of map :
Okay, let’s see what do we got here ? First we use open class technique to redefine the native map function. We iterate on the array using the self keyword and the each function. Then we add the result of block.call(elem) in result and return when all the iteration are done. What the eck does block.call(elem) mean ?
Explicit block : In ruby, when you use the & symbol as parameter you specify that explicitly this parameter will be a block.
The map function in ruby call the to_proc function trying to convert the block variable (:to_s) into a proc.
As stated by the doc of ruby, this is the to_proc definition of the function of the Symbol class :
returns a Proc object which respond to the given method by sym.
We now know that block.call is a proc calling the to_s function on the parameter given. In other word the to_s function is called on each elem of the array through a proc.
Let’s recode the to_proc method of the Symbol’s class
Okay, you think I am crazy but I can assure you it’s not that difficult. block.call is … called by the map function (map.rb), passing elem (one of the object when iterating the array) as parameter into the to_proc function of the symbol class as the obj parameter, and from here we call the send function with self which is equal to :to_s and guess what ? Have you ever seen a line of code like this : 1.send(:to_s) yep ! You do ! And that’s how we get a result like ["1", "2"]
In this post, I will talk about scope in ruby. We will see the following :
Top Level Scope
Scope gate
Flate scope
Top Level Scope
kesako ? In order to understand the concept there is one prerequisite to understand first.
In ruby everything is an object, meaning that when you launch irb or pry, you’re already inside an object.
You understand it, even when you launch the interpreter you are already in an object called main belonging to the Object class.
The top level scope simply put is the scope you’re in when you don’t have called any methods yet or they just finished and you just arrived in the interpreter.
example.rb
str="abc"# Top Level ScopeclassA# I am not in the top level scopedefb# I am not in the top level scopeendend# Top Level Scope
From the moment you’re in a class, you’re not in the top level scope anymore
Scope Gate
Whenever the ruby interpreter meet the following keywords : class, def, module, it leaves the previous scope and open a new one. Each of the keywords act as a scope Gate : it determines which local variables are accessible at any given time.
In this case none of the defined variable are in the same scope, so none of them can use the other to compute something.
Flat Scope
Now that we understand the Scope gate concept, let’s see how we can counter it. Instead of using the keyword class we can use Class.new and in this way we will be able to access variable from the top level scope.
Theses snippets of code rely on the scope of block in ruby, indeed creating a block capture the local binding, in the case : b
Conclusion
The top level scope and the Scope gate are two important concept in ruby, however I have doubts about the usefulness of Flat scope, since it does not respect at all OOP.
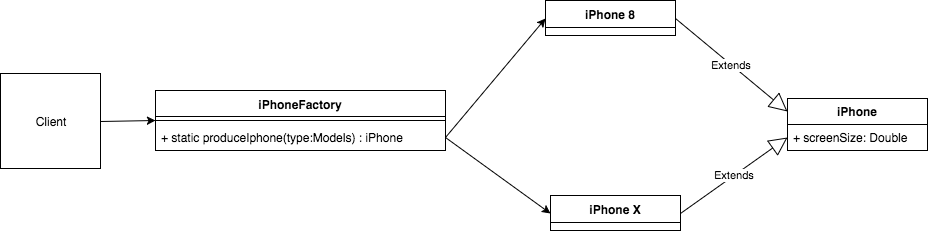
A factory is an object which has the role to create multiple objects. In other word this is a wrapper that we go through to instantiate different objects from the same place. Since we are going to show this through Swift, let me take an example of Factory producing iPhones.
This is the final result of the (Simple) Factory Pattern :
Here are the different available iPhone at the moment :
iPhone X
iPhone 8
Let’s create an enum for all of these models :
enumModels{caseXcaseiPhone8}
These are the classes representing the different iPhones on the market. We use inheritance to save the common attributes.
After having writing this article I realize how wrong it is to use singleton for a factory. Directly calling a static function allow to save memory (no singleton instantiated), writing less code and is a lot less verbose : iPhoneFactory.produceIphone(type: .iPhone8) compared to iPhoneFactory.sharedInstance.produceIphone(type: .iPhone8).
To conclude, a factory is a wrapper which instantiate multiple different objects (which implement an interface or protocol in Swift, inherit from a parent-class) based on parameters, here, an enum.
After seeing the basic of Swift comes the moment where you need to know some patterns. A design pattern, is a re-usable code that allow to solve common problem when designing an application. Today we’ll see the Adapter pattern.
Adapter, what for ?
An adapter is a wrapper that allow a class to work with a specific protocol where the parameter of the class are not sufficient to operate the said protocol.
The most comprehensible post is IMHO, a problem that I found on the internet :
You have a protocol with a function display that expect to receives “x1, y1, x2, y2” and a Rectangle class that is initialized with “x, y, width, height”. How are we going to make the Rectangle class compatible with the display function ? Yes, you are right: Adapter !
The different players
Target : The target is the interface that the adapter needs to implement
Adapter : The adapter is the class containing the logic allowing the adaptee and the target to work together.
Adaptee : The Adaptee is the class that need an adaptor
Thread is a fondamental notion not only in Swift but in computer science generally, and if you build a serious application at one moment or the other you will need them.
Threads and Concurrency
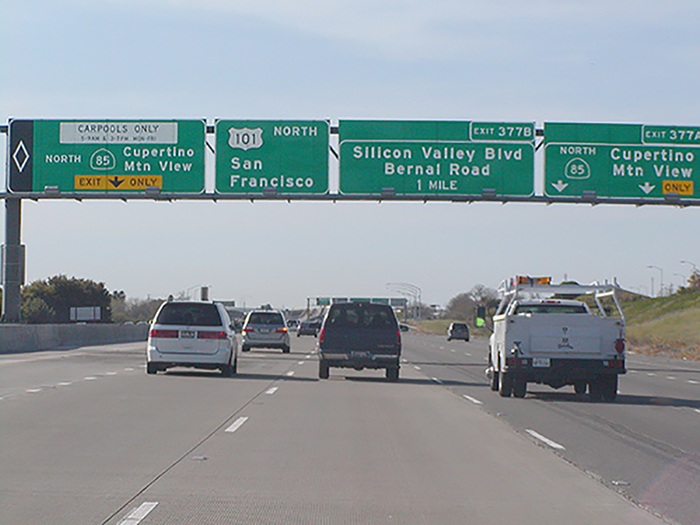
Concurrency is basically doing multiple tasks at the same time. Each tasks is executed by a thread. In iOS these threads are managed independently by the OS. We can think of threads as a highway :
Each car represent a task and each lane represent a Queue. When you go on the highway in the USA, you can notice sometimes an HOV lane, represented by an diamond on the floor and generally on the left : they are reserved for car with two three people inside, its goal is to reduces pollution and traffic. The main thread on Swift should follow the same idea : we don’t want it to be busy because this is where we are going to apply UI task, so the fastest, the best. The background heavy tasks should operate on the right, i.e on the other threads.
Grand Central Dispatch
To make developer’s life easier, Apple has built Grand Central Dispatch (GCD) a low level API built on top of threads. This API allow to easily create and manage threads. The only thing we have to do is giving the API a queue. So now you are probably asking : What is a queue ?
We can make an analogy with people waiting in line for an event. The line is the queue and each person is a task.
There are two type of queue : Serial and Concurrent one.
Serial Queue
The important notion with Serial Queue is : First In First Out (FIFO).
—Task4—Task3—Task2—Task1—>
Task2 does not start until Task1 is finished. Task3 does not start until Task2 is finished etc… There is a predictable execution Order. And since they are executed one by one they prevent from race condition issue.
Concurrent Queue
In a concurrent Queue every task start in order, however the order of completion is unpredictable : Task2 can finish before Task1.
A concurrent Queue is faster because things are done concurrently (every task are executed at the same time) however, the completion order is changeable, which can lead to race condition issue. Now that you have the good knowledge, let’s dive into the code.
DispatchQueue
The DispatchQueue object manages the queue. The main and global queues are available : they are for UI task and heavy task such as Fetching JSON Data from a REST API respectively. Let’s highlight the difference between a serial queue and a concurrent queue through some code :
It is possible to modify the qos parameter, basically it manages the priority, e.g with two background queue (global) having .background and .userInteractive we can expect this type of result :
🔵🔴🔵🔴🔵🔴🔵🔴🔵🔴🔵🔵🔵🔵🔴🔵🔴🔴🔴🔴
Now to demonstrate the principle of a serial queue, let’s take the main queue.
In these two example we use the async method to perform the action. Just as a note :
In a synchronous block, the main threads get the control back once the function is finished.
In a asynchronous block, the code is executed on a parallel thread but the main thread is not blocked. Thus the asynchronous function does not block the behaviour of an application.
Be careful this does not mean that the thread is not concurrent ! It still is.
When the main thread reach line 3, a new task is added to the background queue. The background thread execute the code to print the red dot. During this time, the main thread is blocked and wait for the synchronous function to return. When the 10 iterations are done, the main thread continue on line 9 and another task is added to the background queue. The background queue execute and once it is finished the main thread get the control back.
In contrast with the snippet of code of the main queue (Serial Queue), the main thread arrive at the first block and a new task is added to the main queue, however the main thread continue to run and the block which print the blue dot is added to the main Queue too. Then the the first block is executed (red dot) and then the second (blue dot).
Synchronous function and Asynchronous function in a Serial Queue accomplish basically the same thing however, there is a difference in term of layer where this operate.
The main queue run on the main threads and is a serial queue. The global queue is running by background threads and is concurrent.
I agree it is the more idiomatic way to express background however semanticaly speaking, It is not clear and intuitive. This leads us to the following snippet of code which although simpler I found easier to read and of course proceed the exact same thing :